项目初始化
配置处理
找不到模块vue

在ts的配置文件tsconfig.json中将moduleResolution: "bundler"修改为moduleResolution: "node"。

原因:当使用此选项时,TypeScript 将按照 Node.js 的模块解析规则来解析模块。它会根据 node_modules 文件夹和 package.json 文件中的 module 字段来找到模块。
找不到vue文件

解决办法:在自动生成的vite-env.d.ts配置文件中添加如下配置。
1
2
3
4
5
| declare module '*.vue' {
import type { DefineComponent } from 'vue'
const component: DefineComponent<{}, {}, any>
export default component
}
|
原因:TS无法解析vue文件,需要添加配置进行解析
tsconfig.json错误

最新的TS已经废弃了allowImportingTsExtensions配置项,需改为allowSyntheticDefaultImports: true。
代码校验、美观配置
Eslint
- 安装eslint
npm i eslint -D (安装在开发环境)
- 生成配置文件
npx eslint --init(后面会有提示,比如仅检验代码规范还是代码问题等按照提示操作即可,最后会生成**.eslintrc.cjs文件**)
- vue3环境代码校验插件
1
2
3
4
5
6
7
8
9
10
| # 让所有与prettier规则存在冲突的Eslint rules失效,并使用prettier进行代码检查
"eslint-config-prettier": "^8.6.0",
"eslint-plugin-import": "^2.27.5",
"eslint-plugin-node": "^11.1.0",
# 运行更漂亮的Eslint,使prettier规则优先级更高,Eslint优先级低
"eslint-plugin-prettier": "^4.2.1",
# vue.js的Eslint插件(查找vue语法错误,发现错误指令,查找违规风格指南
"eslint-plugin-vue": "^9.9.0",
# 该解析器允许使用Eslint校验所有babel code
"@babel/eslint-parser": "^7.19.1",
|
安装指令
1
| npm install -D eslint-plugin-import eslint-plugin-vue eslint-plugin-node eslint-plugin-prettier eslint-config-prettier eslint-plugin-node @babel/eslint-parser
|
- 在**.eslintrc.cjs**文件中加入如下配置(出自尚硅谷——硅谷甄选项目)
1
2
3
4
5
6
7
8
9
10
11
12
13
14
15
16
17
18
19
20
21
22
23
24
25
26
27
28
29
30
31
32
33
34
35
36
37
38
39
40
41
42
43
44
45
46
47
48
49
50
51
52
53
54
55
56
57
58
59
|
module.exports = {
env: {
browser: true,
es2021: true,
node: true,
jest: true,
},
parser: 'vue-eslint-parser',
parserOptions: {
ecmaVersion: 'latest',
sourceType: 'module',
parser: '@typescript-eslint/parser',
jsxPragma: 'React',
ecmaFeatures: {
jsx: true,
},
},
extends: [
'eslint:recommended',
'plugin:vue/vue3-essential',
'plugin:@typescript-eslint/recommended',
'plugin:prettier/recommended',
],
plugins: ['vue', '@typescript-eslint'],
rules: {
'no-var': 'error',
'no-multiple-empty-lines': ['warn', { max: 1 }],
'no-console': process.env.NODE_ENV === 'production' ? 'error' : 'off',
'no-debugger': process.env.NODE_ENV === 'production' ? 'error' : 'off',
'no-unexpected-multiline': 'error',
'no-useless-escape': 'off',
'@typescript-eslint/no-unused-vars': 'error',
'@typescript-eslint/prefer-ts-expect-error': 'error',
'@typescript-eslint/no-explicit-any': 'off',
'@typescript-eslint/no-non-null-assertion': 'off',
'@typescript-eslint/no-namespace': 'off',
'@typescript-eslint/semi': 'off',
'vue/multi-word-component-names': 'off',
'vue/script-setup-uses-vars': 'error',
'vue/no-mutating-props': 'off',
'vue/attribute-hyphenation': 'off',
},
}
|
也可以使用以下配置
1
2
3
4
5
6
7
8
9
10
11
12
13
14
15
16
17
18
| module.exports = {
env: {
browser: true,
es2021: true,
node: true,
},
extends: ["plugin:vue/vue3-recommended", "plugin:prettier/recommended"],
parserOptions: {
ecmaVersion: "latest",
parser: "@typescript-eslint/parser",
sourceType: "module",
},
plugins: ["vue", "@typescript-eslint", "prettier"],
rules: {
"prettier/prettier": "error",
},
};
|
- 生成忽略文件
文件名.eslintignore,忽略dist和node_modules文件夹
Prettier
有了eslint,为什么还要有prettier?eslint针对的是javascript,他是一个检测工具,包含js语法以及少部分格式问题,在eslint看来,语法对了就能保证代码正常运行,格式问题属于其次;
而prettier属于格式化工具,它看不惯格式不统一,所以它就把eslint没干好的事接着干,另外,prettier支持包含js在内的多种语言。
安裝依赖包
npm install -D eslint-plugin-prettier prettier eslint-config-prettier
引入Ant Design组件库
vite按需加载
antd官网vite按需加载推荐在 vite.config.js 文件中引用 ‘’vite-plugin-components‘’,该方法是错误的,官网将vite-plugin-components 已经更名 unplugin-vue-components
- 安装unplugin-vue-components
npm i unplugin-vue-components -D
1
2
3
4
5
6
7
8
9
10
11
12
13
|
import Components from 'unplugin-vue-components/vite'
import { AntDesignVueResolver } from 'unplugin-vue-components/resolvers'
export default defineConfig({
plugins: [
Components({
resolvers: [AntDesignVueResolver()]
})
]
})
|
随后即可在项目中直接使用所需的组件,不需要引用,再用app.use进行注册。
设置路径别名
如果使用**@代替src**,而不使用相对路径,如下图所示。

则需要配置两个配置文件vite.config.ts和tsconfig.json
- 引入path模块
import path from 'path'
- 在defineConfig中进行如下配置
1
2
3
4
5
6
7
8
| export default defineConfig({
resolve: {
alias: {
"@": path.resolve(__dirname, "./src"),
},
},
}
|
在compilerOptions中添加如下配置
1
2
3
4
5
6
7
8
| {
"compilerOptions": {
"baseUrl": ".",
"paths": {
"@/*":["src/*"]
}
}
|
Pinia状态管理
使用步骤
- npm安装
npm i pinia或yarn add pinia
- 在main.ts中创建pinia实例进行使用
1
2
3
4
5
6
7
8
9
10
11
|
import { createApp } from 'vue'
import { createPinia } from 'pinia'
import App from './App.vue'
const pinia = createPinia()
const app = createApp(App)
app.use(pinia)
app.mount('#app')
|
- 通过
defineStoreAPI创建store(一般新建一个store文件夹专门存放状态文件)
1
2
3
4
5
6
7
8
9
10
11
12
13
14
15
16
| import { defineStore } from "pinia";
export const useTerminalConfigStore = defineStore("terminalConfig", {
state: () => {
return {
};
},
getters: {
},
actions: {
},
});
|
命令组成
TIndex是借鉴Linux的命令格式的,所以命令由三部分组成,分别是命令本身、命令参数、命令选项。命令本身是必须的,命令参数和命令选项是可选的。
命令选项的作用是说明对命令的要求
命令参数是描述命令的作用对象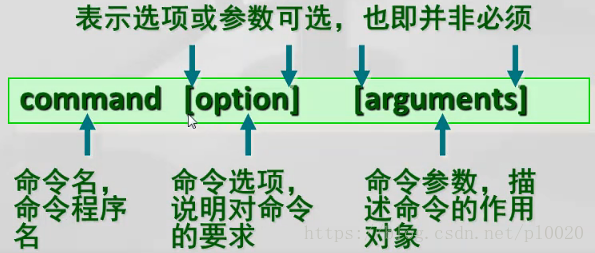
接下来看看TIndex的命令组成,以baidu命令为例(只看与Linux对应的部分)。
1
2
3
4
5
6
7
8
9
10
11
12
13
14
15
16
17
18
19
20
21
22
23
24
25
26
27
28
29
| const baiduCommand: CommandType = {
func: "baidu",
params: [
{
key: "word",
desc: "搜索内容",
required: true,
},
],
options: [
{
key: "self",
desc: "是否在当前页打开",
alias: ["s"],
type: "boolean",
defaultValue: false,
},
{
key: "picture",
desc: "是否搜索图片",
alias: ["p"],
type: "boolean",
defaultValue: false,
},
],
action(options, terminal) {
...
},
};
|
命令执行过程
- 终端Terminal 输出命令通过doSubmitCommand函数给父组件传递命令,参数为命令字符串
- 通过父组件IndexPage调用props.onSubmitCommand提交命令,参数为命令字符串
- 组件IndexPage中通过doCommandExecute(函数位于core文件夹中)进行命令解析(解析文本,解析参数),参数为命令字符串,终端组件本身(通过ref获取组件)
- 每个命令(core文件夹下)最终都会有一个action函数进行执行命令,最后执行调用action即可
命令解析后的parsedOptions
_ 存放 params,剩下options以[key:value]的形式保存。
getOpts库会将以-或–开头的参数置为当作options,以key:value的形式保存。
当输入user –help时,help后面没有跟参数,那么getOpts库就会将help当作key,value默认置为true,即help: true(注:当输入 user -help只有一个-时,getOpts会把help拆分成字符数组,即h:true,e:true,l:true,p:true)


而当输入user –help you 时,help后面跟了参数,则help的value值为you,即help: you


当输入user help时,getOpts就会将help当作params,置于_数组中。


依据这些获取的参数就可以进行一系列操作,就以user register -u huajiao1 -p 12345 -e 123@qq.com 为例,此时getOpts的解析结果应该是这样的
1
2
3
4
5
6
| {
_:['register'],
u:'huajiao1',
p:'12345',
e:'123@qq.com',
}
|

此时因为_中有子命令,所以会在doCommandExecute中进行判断,并进行递归执行。
1
2
3
4
5
6
7
8
9
10
| if (
_.length > 0 &&
command.subCommands &&
Object.keys(command.subCommands).length > 0
) {
const subText = text.substring(text.indexOf(" ") + 1);
await doCommandExecute(subText, terminal, command);
return;
}
|
所以register又会作为新命令再执行一次,即register -u huajiao1 -p 12345 -e 123@qq.com

具体命令
快捷键命令
监听键盘的onkeydown事件,获取按下的键值。将所需要的快捷键都注册到快捷键列表中,快捷键列表中每一个快捷键的参数类型定义如下。
1
2
3
4
5
6
7
8
9
10
|
interface shortcut {
code: string;
desc?: string;
keyDesc?: string;
ctrlKey?: boolean;
shiftKey?: boolean;
metaKey?: boolean;
action: (e: KeyboardEvent, terminal: TerminalType) => void;
}
|
其中ctrlKey、shiftKey、metaKey参数的作用为用于判定Ctrl+L这样的快捷键,判断时需要跟event的ctrlKey、shiftKey、metaKey键进行比较,因为KeyboardEvent中可以获取到这些键是否按下的布尔值。

随后只需进行比较即可,快捷键实现的完全代码如下所示。
1
2
3
4
5
6
7
8
9
10
11
12
13
14
15
16
17
18
19
20
21
22
23
24
25
26
27
28
29
30
31
32
33
34
35
36
37
38
39
40
41
42
43
44
45
46
47
48
49
50
51
52
53
54
55
56
57
58
59
60
61
62
63
64
65
66
67
68
69
70
71
72
| export const shortcutRegister = (terminal: TerminalType) => {
document.onkeydown = (e: KeyboardEvent) => {
let key = e.key;
if (key >= "a" && key <= "z" && !e.metaKey && !e.shiftKey && !e.ctrlKey) {
terminal.inputFocus();
return;
}
let code = e.code;
for (const shortcut of shortcutList) {
if (
code === shortcut.code &&
e.ctrlKey === !!shortcut.ctrlKey &&
e.shiftKey === !!shortcut.shiftKey &&
e.metaKey === !!shortcut.metaKey
) {
shortcut.action(e, terminal);
}
}
};
interface shortcut {
code: string;
desc?: string;
keyDesc?: string;
ctrlKey?: boolean;
shiftKey?: boolean;
metaKey?: boolean;
action: (e: KeyboardEvent, terminal: TerminalType) => void;
}
const shortcutList: shortcut[] = [
{
desc: "清屏",
code: "KeyL",
keyDesc: "Ctrl + L",
ctrlKey: true,
action(e, terminal) {
e.preventDefault();
terminal.clear();
},
},
{
desc: "回车执行命令后聚焦文本框",
code: "Enter",
action(e, terminal) {
e.preventDefault();
terminal.inputFocus();
},
},
{
desc: "查看上一条命令",
code: "ArrowUp",
keyDesc: "↑",
action(e, terminal) {
e.preventDefault();
terminal.showPrevCommand();
},
},
{
desc: "查看下一条命令",
code: "ArrowDown",
keyDesc: "↓",
action(e, terminal) {
e.preventDefault();
terminal.showNextCommand();
},
},
];
};
|
Tab补全快捷键
判断hint是否有值,有值就将其赋给当前输入框,即InputCommand中的text(因为InputCommand的text属性和输入框双向绑定)。
1
2
3
4
5
6
7
| const setTabPatching = () => {
if (hint.value) {
InputCommand.value.text = `${hint.value.split(" ")[0]}${
hint.value.split(" ").length > 1 ? " " : ""
}`;
}
};
|
随即在快捷键列表注册即可。
1
2
3
4
5
6
7
8
9
10
11
12
13
14
| const shortcutList: shortcut[] = [
{
code: "Tab",
desc: "快捷键补齐",
action(e, terminal) {
e.preventDefault();
if (terminal.isInputFocus()) {
terminal.setTabPatching();
} else {
return;
}
},
}
]
|
历史命令(快捷键↑和↓实现)
使用快捷键可查看上一条或者下一条命令,具体快捷键注册在上面已经讲过了。而历史命令的快捷键则是通过终端调用showPrevCommand和showPrevCommand方法去实现。接下来讲这两个方法的具体实现过程。
这两个方法都封装在useHistory这个hook中,定义在与YuTerminal.vue同级目录下。
这个hook接受两个参数,分别是commandList(命令列表,即输入的不为空的有效命令)和inputCommand(当前输入框对应的值),返回四个方法或值,commandHistoryPos(可以看作指针,用于指向当前查看的命令位置)、showPrevCommand、showPrevCommand、listCommandHistory(用于history命令)。
这里以showPrevCommand为例。
1
2
3
4
5
6
7
8
9
10
11
12
13
14
15
16
17
18
19
|
const showNextCommand = () => {
if (commandHistoryPos.value < commandList.length - 1) {
commandHistoryPos.value++;
inputCommand.value.text = commandList[commandHistoryPos.value].text;
} else if (commandHistoryPos.value === commandList.length - 1) {
commandHistoryPos.value++;
inputCommand.value.text = "";
}
};
|
help命令
help命令文件夹中有四个文件:CommandHelpBox.vue、HeloBox.vue、helpCommand.ts、heloUtils.ts。
HelpBox.vue
用于呈现所有的命令。
helpCommand.ts
help命令。
当使用defineAsyncComponent异步加载组件时,可能会出现以下警告。

这是因为此时Vue接收了一个响应式的组件(看意思是这个,具体我也不清楚),所以需要使用markRaw(让其变为非响应式)或shallowRef(仅让其浅层为响应式)。如下所示。


